Translate

Monday, August 31, 2009

Homemade Deep Well Hand Pump

I found this site today and the "well" page is pretty interesting.
http://www.fdungan.com/well.htm

It talks about driving your own 80 foot well with a wooden hammer or a post pounder. And it explains the different type of wells and how to dig them. But I found this homemade hand pump the most interesting.

It is made of some hose adapters and a brass ball. It acts as a check valve. This goes down in the well and is attached to some stiff UV resistant irrigation hose. When you pull it up and down it starts pumping water. It may take a lot of effort the first time you set this up but after that it is much quicker because it doesn't lose its prime. I estimate about 50 strokes per gallon.
Also, even if you are going to use an electrical pump, this manual pump still comes in handy for when you first dig the well. It allows you to clear out the sand and silt very quickly.

This type of pump will work for years and doesn't require maintenance. Pretty impressive for just a few bucks at the hardware store. Looks like it would be great for emergencies or for off grid water pumping.

Richard

Wednesday, August 26, 2009

Liar Liar Pants on Fire

Today I was browsing ebay looking at wind turbine stuff. I came across this link here. Here is an excerpt:

Wind Turbine 1000 watt. Complete system minus inverter and battery

This is the Best of the Best. Made in Michigan. Made in the U.S.A.

This high out put 1000 watt Wind Turbine is the best out there to start with;

The frame is made of 6061 aluminum aprox 52 inches long strong yet light. bolted together with stainless steel washers nuts and bolts. This unique designed lets you install the wires down the center of the tube so the wires wont get tangled up.This is truly a work of art.

Dont buy a frame thats made out of cheap steel from china then welded by a amatuer and painted over, the frame will rust crack paint will chip off and will look terrible in weeks

This heavy duty motor/generator can produce a 1000 watts as a wind generator. The wind generator is rated for 130 volts dc 8 amps and reversible (creates electricity spinning in either directions they have thick magnets and brushes inside the housing. The outside housing is painted with white epoxy paint.The motor hits about 12 volts at 12 mph start up speed is about 3-4 mph. This is a awsome motor.

Dont waist your money with one of those 200 watt systems

These blades our the best out there. You get 3 turbo torque aircraft grade aluminum. The blades are about 5 inches wide at their widest and 24 inches in length (diameter of swept area is aprox 52 inches) with hub. These are cnc machined with a dimensional tolerance of .005 inches. They are perfectly balanced and spin very smooth.they are light strong and will not rust built to last , low wind start up about 3-4 mph. Our blades can with stand 70 mph.our blades our field tested and under go hundreds of hours of prototyping.

-------------

This upsets me. Some people read this and don't see the problems.

1) It says a 1,000 watts - and we know that 8 amps multiplied by 130 volts is 1,040 watts. But, in real life we are charging a battery. In this case a 12 volt battery. If the battery is maxed at 15 volts and you put out 8 amps then that is only 120 watts. But in cold strong wind you can get up to 3 times the current rating, making this a 360 watt wind turbine system at best.

2) It only produces 12 volts at about 12 mph wind. But a battery is usually 12.7 volts or more and the voltage drop across the diode is 0.7 volts. That means that you need 13.4 volts or more to start charging. So, with a 4.3 foot diameter blade (52 inches) that means on a breezy day when the average wind speed is about 17 mph, you would only average about 50 watts of power.

3)This is one of those cheap treadmill motor that has very poor bearings. It will break under high winds and prolonged use. These motors don't produce any usable power until you get to high rpms and that means it is a poor choice for wind turbine use.

4) If the blades are 30% efficient and the motor is 50% efficient, then overall the system is 15% efficient. When I put that in my motor analyzer, I get the following:

So, the part of the description that says don't waste your time with a 200 watt system is obviously misleading. This system is basically a 200 watt system in a "real world" situation.

5) Notice that I used a TSR of 5 and RPM of 4500. But, that is very generous of me since most treadmill motors have a 5,000 or more RPM rating. Also, TSR of 5 implies that the blades have lift. A curved surface alone will not make much lift. You need a curved leading edge and a sharp trailing edge. I'm guessing that this blade would have about a 3 to 5 TSR rating.

6) I like aluminum, but remember, even the best aluminum will get micro fractures at stress points and they build up over time. But the thick pvc pipe painted with titanium dioxide paint will last for years.

7) Just because the blades can handle 70 mph winds doesn't mean that the little bearings in that cheap motor can handle that for any length of time.

So, this is about a 200 to 300 watt wind turbine that needs a very breezy location to make any usable power. And the motor bearings will break in about 6 months to a year. There is a way to use these motors and make them last...but this aint it.

Richard

Friday, August 21, 2009

Some more Fog Catchers

I like the concept for collecting water from fog. There are a lot of places that could use this and it requires no electricity.


I have an idea that you could make electricity with this as well, using the "electret effect". But I'll do some more research into that and some testing before I write about that.

Have a good weekend,
Richard

Wednesday, August 19, 2009

Temperature Coefficient for Electrical Resistivity

I remember telling someone in a forum about using stainless steel bolts as a shunt for use as a cheap current measurement. Someone else said that shunts are made with exotic (aka expensive) materials with very low thermal coefficients of resistance. I found this chart not too long ago and thought I would post it.

As you can see, stainless steel has a negligible coefficient. So, I feel vindicated. Stainless steel is exotic by the way. It is just mass produced and used for construction, thus making it pretty cheap.

Richard

Tuesday, August 18, 2009

Video of Motor analyzer update

Here is the video showing it in operation. Remember, if you purchased this in the past then this is a free upgrade.

Monday, August 17, 2009

new version of motor analyzer released

This is the latest version, 1.6, just released. It does VAWT and HAWT now and will save 3 motor configurations. If you have already purchased in the past, I will upgrade you for free. Just send me an email. There is a part that I'll change on the next release. It says, "Power from blades after friction losses" and should now read, "power from blades after all losses".

I'll make a video of the new program in action and post it on youtube and here.

have a good monday,
Richard

Friday, August 14, 2009

Scalable First Flush System for Rainwater Collection

gutter debris deflection


first flush systemHere is a simple idea for a "first flush" system for rainwater collection. It is made of pvc pipe and the first flush section is made of 4 inch pipe. For every 18.5 inches used, it will hold 1 gallon. It is scalable by adding more pipes to the left side. I could use 2 pipes at 46 inches each and get 5 gallons of first flush capability, for example. The pipes have a bottom cap and a small hole drilled in them. This way, when the rain starts falling, the first 5 gallons would go into these pipes and fill up faster than the small holes at the bottom will drain. After the pipes fill up, the water (now clean) overflows into the storage tank. This process rinses away bird droppings, leaves, dust, bugs, etc. If you have a larger roof, you may want more first flush, such as 10 gallons or more. It also helps to have a way to stop the leaves and big stuff from even getting this far. Some people use screened gutters, or a screened redirector right before it goes into the first flush section.

You guys have a good weekend.

Richard


Amazon.com
$31.65

Amazon.com
$32.35


Wednesday, August 12, 2009

update solar oven


Got some flat black barbecue paint and painted the solar oven. I will let it dry tonight and then tomorrow put it in the sun to make sure any toxins can gas out. It is high temp paint but I'd like to be safe. Then we can start using it.

Remember, this one doesn't have insulation. When the temp outside is a little cooler, I'll raise efficiency by using the hot box cooker technique. I'll take a bigger box and place a thick blanket over it and push this cooker down into that so that all sides except the top are covered and well insulated.

Most people would build in the insulation but there are issues with that. Whenever the food steams it could get the insulation wet and mess it up. The hot box way means I can take out the insulation super easy after I'm done and let it dry if it gets wet.

Richard

Rooftop Savonious Discussion

I'd like to talk a little about a vertical axis wind turbine positioned on its side. Yeah, I know, it becomes a HAWT when you do that. The main problem is that, in that position, it doesn't spin from all wind. But there are some advantages. Firstly, it is low profile and neighbors are less likely to complain. Secondly, it is technically easier to mount this way. Standing straight up means the mount point has to be way stronger due to massive torque effects. And thirdly, you can link several wind turbines in a row to share shaft power to one powerful generator.

There is also an advantage to putting a VAWT on the rooftop. When the wind comes, it is compressed upward and effectively gives the savonious more surface area of wind collection. If the wind is traveling perpindicular to the axis then you will get your maximum power potential. In the below example, there is a VAWT 8 feet long and 4 feet wide and it s laying down on its side at the rooftop. In this example the roof rises 8 feet. That means that whatever power the wind turbine would generate in a given wind is multiplied by 3. Of course, a different roof and sized wind turbine would generate different results. So, if it ran at 15 % efficiency normally, then on the rooftop it could be up to 45% efficient. Also note that wind at the peak of the house is stronger than wind at the ground level.

In the below picture you will see wind angles at 45 degrees from perpindicular to the axis. At 45 degrees, the wind turbine should appear to have half the surface area. So, half of 45% would be 22.5% efficiency, still good. At 60 degrees off perpendicular, the silhouette would become one third of full and, in spite of the roof, would make the overall efficiency become 15%. In other words, you can get normal power even at extreme angles. And at perpindicular angles, get 3 times the normal power output.

Some roofs have sections that are perpindicular to each other. Another VAWT could be mounted there as well. That way you generate power no matter what direction the wind comes from. And even if you only have one, whenever the wind direction changes back to a better angle, the power increase more than makes up for the times when no power was generated. Just make sure that your predominant wind is the right direction, otherwise this just wouldn't work for you.

Richard

Tuesday, August 11, 2009

DC Motor Analyzer Finished

Well, it looks like I've finished the updates on my DC motor analyzer software. I still have to do some more testing before I make it available but here are some screenshots. The yellow highlighted sections are new parts to the program. They are only highlighted here for you to see, the program normally doesn't show that. The first picture below is in the HAWT mode, or horizontal axis wind turbine. The second picture is in VAWT mode. So, you can do savonious or other vertical axis wind turbines.


Something to be aware of if you go to the VAWT calculator web page on my website, is that those computations also account for about a 55% efficiency dc motor. So, if you take a savonious and the blades are 15% efficient and the motor is 55%, then on the new motor analyzer software you would put in 8% efficiency. On the website, this was done in the background. But the new program gives you more control.

For instance, if you have blades that are 30% efficient for a HAWT and your DC motor is 60% efficient, then you can put 18% in the efficiency field and get a nice "real world" expectation. Especially when you put in the cable length and gauge.

I should have my testing done by this weekend at the latest and the new analyzer should be available for purchase.

Richard

Monday, August 10, 2009

Cardboard Solar Oven

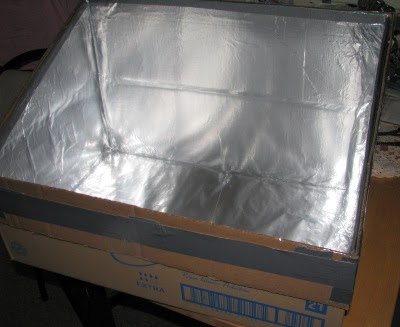
This is the third solar oven that I've made over the last few years. But this is the first cardboard one I've made. This first pic is the oven without the lid and the second picture is with the lid on.


I still have to paint the inside with some flat black paint. I'll leave the top back 1/4 or so unpainted.

My first test will be without any insulation, just like you see in the pictures. Then I will try the hot box cooker approach. I will take a bigger box and a thick blanket or two and push this down inside so it will be surrounded by the blankets except the glazing section. Then I will add a reflector and see if it improves. Although a reflector mounted on the back of a slant face oven is almost pointless unless the sun is really high, or unless you have a flat top glazing.
And something to be aware of is that (as is true for all solar) size is king, or in this case, surface area of the glazing is king. Here is a picture of a small solar oven that has a 1 square foot piece of glazing letting the sun in.
With the reflector put into position and if it is facing the sun perfectly it will have 3.5 square feet of solar collection. You could make a solar oven with a slanted face that has 3.5 square feet of glazing and you would get the same efficiency without the reflectors.

Also, be aware that reflectors can get in the way. If you don't rotate that funnel type every 30 minutes to an hour, then you will get shadows from the reflectors.

Earlier testing with a thin plywood solar oven with no insulation showed temperatures from 190F up to 225F on a sunny summer day. I expect about the same with the cardboard one.
I'll keep you guys posted.

Richard

Friday, August 7, 2009

Rocket Stove

I was talking about hot box cookers the other day and thought this would be an appropriate method for bringing food to a boil and then using the hot box to finish it off. This one is really simple and made with just some adobe bricks.

I like the rocket stoves because they make a lot of heat with very little input. They fact that they are smokeless tells me that they are very efficient. And combined with the hot box method, this is an off the grid dream come true.

See ya Monday,
Richard

Thursday, August 6, 2009

Update on DC Motor Analyzer

Most of you are aware of the DC motor analyzer program I wrote. I have been in the process of upgrading it to visual basic dot net. The old version was written in vb 5. As you can see, in the picture above, I've added a few things.

Now you can select Motor1 to Motor3 and hit save for future use. You can also select it and hit load. This is great for comparing a few motors and configuration settings.

I've also added an efficiency setting. The older program defaulted to 30 %. This is really handy for more real world applications. For instance, the blades may be 30% efficient, but the motor may only be 50%. In that case, set the efficiency field to 15%. In other words, it is an overall efficiency measurement. Everything except voltage drop. That is handled separately.

When you move your mouse over the chart area it now displays watts and amps.

I've also added a field in the bottom left to show the wind speed that battery charging starts. If you set it up to start charging at too low a wind speed and you don't have enough torque, then you will get an error now.

I have a few small changes to make and I still have to get the print function to work. But it will be available sometime in the next couple of weeks. Any customer that purchased the older program can upgrade to this version for free. You will just have to send me an email and the date of your purchase.

If you don't have the older version but would like to see it operate, you can see some of my older videos on youtube. You can also see a video of the updated software there as well. It doesn't have all the changes yet because I made the video yesterday.

Richard

Wednesday, August 5, 2009

Slow Sand Filter


I prefer the ceramic filter over a slow sand filter, but in an emergency it would be good to know how to make these.

Something to remember is that there is a layer at the top couple of inches in the sand called the hypogeal layer or Schmutzdecke. It contains all the bacteria that help clean the water. Just pouring the water in too fast can wreck it. And it takes a couple of weeks to repair. The same is true with the backflushing. It would be a good idea to have 2 of these, that way if you have to backflush, then the other one is still functioning. Some people use a top diffuser to limit the disturbance when putting water in. And you don't have to use activated carbon. That is mainly for clearing up odors and tastes.

Richard

Monday, August 3, 2009

Hot Box Cooker

I just read a great article and interview on Wretha's blog.
http://wretha.blogspot.com/2009/07/new-old-way-to-cook-book-review-video.html

The premise is simple. Heat your food to boiling temps for a few minutes, then turn the heat off and take the food and place in a very insulated box so it can slow cook for the next 3 plus hours. I know it is a simple concept but I am totally amazed by how much power or fuel you can save this way. Not to mention the facts that you can't burn the food, it tastes better, food keeps it's shape and yet is fully cooked, and doesn't heat up the kitchen.

With my limited wind and solar system I wouldn't want to waste power for cooking. But if I ran the stove top for 20 minutes and used 1500 watts, then that would be 500 watt hours or 42 amp hours. That is only 10 % of my golf cart batteries or about 6 % of my forklift batteries. But, if I tried to slow cook something all day on the stove, it would drain my batteries. This is huge, people!!! Another thing you could do is to take the black pot and put it in the sun so it preheats. If you have a solar oven you can just cook in that. But in the winter time, you could just place the pot of water in the sun to preheat it. This will save some more energy.

This simple concepts of hot box cooking and solar ovens will help us tremendously in the near future. So, check out the post and watch the video. Thanks, Wretha, for a great article.

Richard