Translate

Saturday, March 7, 2020

Colloidal Silver Update - 2020

Colloidal Silver - Update 2020

I've learned a lot about silver since 2009 and I thought it was time for some updates. First, let's talk about ionic vs colloidal. Ionic is what people typically make and it is about 80 to 90% ionic and the rest is colloidal.

Ionic

Ionic silver is made by using a slow cook process at room temperature. This is done my using silver electrodes in distilled water (no electrolyte) and applying about 9 to 27 volts DC to the electrodes. After a few hours, the current begins to rise but is limited by some circuit or resistor. The process can take 2 to 6 hours to complete.

Ionic silver is fantastic for bacteria and most yeast, but is 12 times less effective than colloidal silver for viruseshttps://www.ncbi.nlm.nih.gov/pmc/articles/PMC6264685/

Also, Ionic silver combines with oxygen and forms silver oxides. If it is ingested, the hydrochloric acid will destroy the oxide layer and turn the silver into silver chloride salts. This can get trapped in the skin over time and is light sensitive. It can turn you blue.

Bottom line, ionic silver has a short shelf life and is good for surface anti-bacterial or anti-fungal applications. It is not good for ingestion.

Colloidal

Colloidal silver is made with boiling hot water and just enough electrolyte to ensure the minimum current is traversing the distilled water. The process forms mostly ionic silver, but the heat and a reducing agent is used to reduce the ions to small nano particles of silver in a colloidal solution. The electrolyte and reducing agent should be chosen based on its safety if ingested.

Electrolyte

The electrolyte is Sodium Carbonate (washing soda). Now, before you freak out about using a few drops of washing soda, let me explain. Washing soda is created by heating baking soda to 350F for about 30 minutes. In other words, every time you bake cookies, you are making washing soda in each cookie. So, it is totally safe to ingest.

The washing soda is mixed in distilled water and stored in a dropper bottle. A few drops are added at the beginning of the process. This ensures that a minimum current is achieved. 
A teaspoon of washing soda to a cup of distilled water makes a good electrolyte.

Reducing Agent

The reducing agent is about 5 drops of corn syrup per liter of solution.

The Equipment

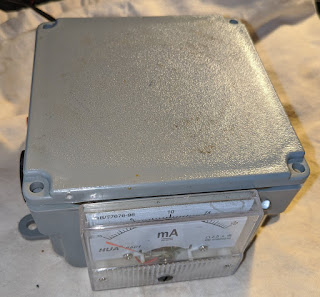
I personally have a homemade unit that has a magnetic stirrer, a current meter, a LED, power switch, wall adapter, etc. But, you really don't need all of that. It is overkill..but, hey, I was bored. :)


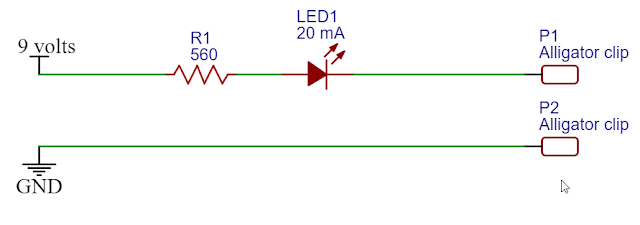
The simplest solution is to use a 9 volt battery and a resistor that is close to 600 ohms. You can even add a 20 milliamp LED to show that the circuit is working.


In the circuit shown above, the typical 9 volt battery will range in voltage from about 8.6 to 9.4 volts depending on its age. With a 560 ohm resistor in the circuit, the current will range from 15.4 mA to 16.8 mA, with an average of about 16 mA.

The Process

The process can be as complicated or as simple as you like. It is based on how much distilled water you have, the current flow through the solution, and the time of the process. I'll show the equation, but I'll keep the process simple. But, feel free to use the equation for different scenarios.

Faraday Laws of Electrolysis

m = K x I x T

M = mass of silver in grams
K = Electrochemical Equivalent for silver = 0.00118
I = current in amps
T = time in seconds

The goal is to produce a liter of colloidal silver with about 20 ppm concentration. To do that, we need: 
  • 1 liter of boiling hot distilled water
  • about 15 mA of current
  • about 20 minutes of process time
Using the circuit above, we will be at 16 mA on average, so it changes the math slightly. We need the mass of silver at the end of the process to be 0.020 grams. In a liter of water, that equals 20 ppm.

M = KIT  ==> T = M/(KI)

Time = 0.020 / (0.00118 * 0.016mA) = 1,059 seconds or 17.65 minutes. If you always go to about 20 minutes, you will have more than 20 ppm to be sure. If you are curious, 20 minutes would give exactly 22.6 ppm.

Steps

  1. Heat 1 liter of distilled water in a clean glass container using the microwave. This typically takes about 4 to 5 minutes. It should be just beginning to boil.
  2. Connect the above circuit to alligator clips.
  3. Connect the other end of the alligator clips to the silver electrodes. Ensure the clips do not touch the water. Only silver should be in the water.
  4. Connect the 9 volt battery to the circuit. At this point the LED should be Off.
  5. Start adding a few drops of the electrolyte to the distilled water while stirring. Note that the LED should start to light dimly. Slowly add drops of electrolyte and stir until the LED is fully lit. Don't add more electrolyte than needed. Usually about 4 drops are used.
  6. Start the timer.
  7. After about 10 minutes, add about 10 drops of corn syrup. The solution should turn more yellow as the ionic silver is converted to colloidal. The heat of the water also starts this process.
  8. At the 17.5 minute mark, you will have 1 liter of 20 ppm high-quality colloidal silver.


I personally use this with an ultrasonic nebulizer to breath into my lungs when I'm fighting a respiratory illness. But, I'm not a doctor. I'll let you use it however you see fit.



Tuesday, December 13, 2016

How much does solar REALLY cost?


This is a video on youtube.com posted by LDSreliance. I thought it was an interesting topic and decided to check out the numbers myself. It has been a long time since I purchased solar equipment and prices have fallen quite a bit. In the video it breaks down prices based on 3 systems; Small (hobby), Medium, and Large.


This equates to $2.50 per watt for the panel and $12 per watt for the system. I decided to check on amazon.com to see how prices compared:

10 amp / 12 Volt charge controller = $11.99
12 Volt SLA Battery - 8 amp hours = $17.99
400 Watt / 12 Volt inverter = $23.48

I believe the wire connectors and mounts would be about $30 as stated. This means that the $120 price tag is conservative.

================================


This equates to $1.40 per watt for the panels and $3.20 per watt for the system. This is how the prices compared on amazon.com:

60 amp charge controller - 12 volts = $45
Batteries - 450 amp hours at 12 Volts = $700 ($350 each)
600 Watt sine wave inverter = $89
Wire, connectors, mounts, etc. = $100
TOTAL = $1,350

The price was a little higher than expected, especially the batteries. A better option might be to desulfate some forklift batteries and save lots of money. I explain how to do that in my wind power ebook.


=======================================


This equates to $1.00 per watt for the panels and $2.83 per watt for the system. This looks fairly close to me as well. I would probably use three of the 60 amp charge controllers at $45 a piece, for a total of $135 instead of $1,100. But, overall, I believe the video to be fairly accurate.


Wednesday, June 22, 2016

Solar Tracker


Making a solar tracker for a solar cooker or solar panels is easier than you may think. You could design one that uses a micro-controller or complex circuit. But, it can also be done with JUST small solar panels and a DC motor.

The concept is simple. You have two or four small identical panels that are each powerful enough to spin a small DC motor. There is a divider between the panels that cast a shadow when the unit is not pointing directly at the sun. The panel that doesn't have a shadow cast on it produces all the power and turns the motor. As the shadow starts to minimize, the other side's panel starts applying reverse current to the motor and slowing it down.

solar tracker circuit


You could have more than one panel each side, as shown below.

solar tracker circuit


Something to remember is that the motor will have to be geared down so the output is lower. Or you can find a geared motor, such as a windshield wiper motor. You could also use a smaller motor and just use a string wrapped several times around the spindle or capstan of the motor. The rest of the string would wrap around a wooden pulley or disk from both sides. And, of course, the string would be stretched taut.


IF YOU'RE INTERESTED IN LEARNING ELECTRONICS 
Then Take A Look At This!

Monday, June 20, 2016

Make your own powerful and simple alcohol stove


I uploaded a couple of videos testing this powerful alcohol stove and some people have asked for instructions on making this. It is very quick and easy to make. Have fun!

Richard

Wednesday, June 15, 2016

Weird way to furl a windmill

I was watching a video on youtube where supergokue1 was running a double windturbine on one mast and connecting the motors in series to get more voltage. The test didn't produce as much voltage as he had hoped, but I had an interesting idea about furling this windmill under higher wind conditions.

SuperGokue1 on Youtube.com

The idea involves a physics concept called gyroscopic precession. This is a phenomenon occurring in rotating bodies in which an applied force is manifested 90 degrees later in the direction of rotation from where the force was applied. We use the right hand rule to determine the torque direction or spin vector.


Applying the right hand rule to the double windmill, based on direction of blade rotation, means that the spin vector is a force acting outward towards the wind. Each blade set is doing that so both forces are balanced. But, what if you design one of the blades so it spun in the opposite direction? And, then, you make the tail smaller? 

The result would be that higher winds will cause the windmill to yaw out of the wind slightly. This will slow the blades down, then gyroscopic procession will decrease as the blades start to spin back into the wind and the process repeats...until a sweet spot is found. This should work nicely for small fast spinning wind turbines. This should protect them in higher winds. Just imagine 40 mph winds while the wind turbine is furled sideways at a 45 degree angle and still producing safe power.