Colloidal Silver - Update 2020
I've learned a lot about silver since 2009 and I thought it was time for some updates. First, let's talk about ionic vs colloidal. Ionic is what people typically make and it is about 80 to 90% ionic and the rest is colloidal.
Ionic
Ionic silver is made by using a slow cook process at room temperature. This is done my using silver electrodes in distilled water (no electrolyte) and applying about 9 to 27 volts DC to the electrodes. After a few hours, the current begins to rise but is limited by some circuit or resistor. The process can take 2 to 6 hours to complete.
Ionic silver is fantastic for bacteria and most yeast, but is 12 times less effective than colloidal silver for viruses. https://www.ncbi.nlm.nih.gov/pmc/articles/PMC6264685/
Also, Ionic silver combines with oxygen and forms silver oxides. If it is ingested, the hydrochloric acid will destroy the oxide layer and turn the silver into silver chloride salts. This can get trapped in the skin over time and is light sensitive. It can turn you blue.
Bottom line, ionic silver has a short shelf life and is good for surface anti-bacterial or anti-fungal applications. It is not good for ingestion.
Colloidal
Colloidal silver is made with boiling hot water and just enough electrolyte to ensure the minimum current is traversing the distilled water. The process forms mostly ionic silver, but the heat and a reducing agent is used to reduce the ions to small nano particles of silver in a colloidal solution. The electrolyte and reducing agent should be chosen based on its safety if ingested.
Electrolyte
The electrolyte is Sodium Carbonate (washing soda). Now, before you freak out about using a few drops of washing soda, let me explain. Washing soda is created by heating baking soda to 350F for about 30 minutes. In other words, every time you bake cookies, you are making washing soda in each cookie. So, it is totally safe to ingest.
The washing soda is mixed in distilled water and stored in a dropper bottle. A few drops are added at the beginning of the process. This ensures that a minimum current is achieved.
A teaspoon of washing soda to a cup of distilled water makes a good electrolyte.
Reducing Agent
The reducing agent is about 5 drops of corn syrup per liter of solution.
The Equipment
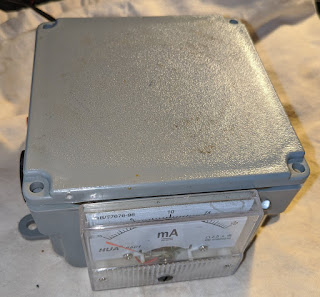
I personally have a homemade unit that has a magnetic stirrer, a current meter, a LED, power switch, wall adapter, etc. But, you really don't need all of that. It is overkill..but, hey, I was bored. :)
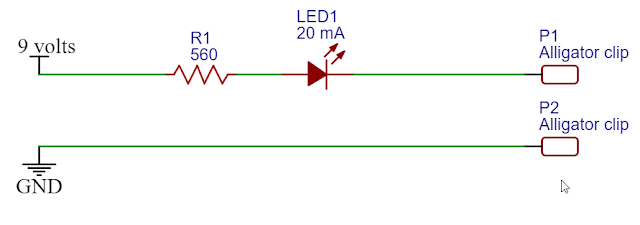
The simplest solution is to use a 9 volt battery and a resistor that is close to 600 ohms. You can even add a 20 milliamp LED to show that the circuit is working.
In the circuit shown above, the typical 9 volt battery will range in voltage from about 8.6 to 9.4 volts depending on its age. With a 560 ohm resistor in the circuit, the current will range from 15.4 mA to 16.8 mA, with an average of about 16 mA.
The Process
The process can be as complicated or as simple as you like. It is based on how much distilled water you have, the current flow through the solution, and the time of the process. I'll show the equation, but I'll keep the process simple. But, feel free to use the equation for different scenarios.
Faraday Laws of Electrolysis
m = K x I x T
M = mass of silver in grams
K = Electrochemical Equivalent for silver = 0.00118
I = current in amps
T = time in seconds
The goal is to produce a liter of colloidal silver with about 20 ppm concentration. To do that, we need:
- 1 liter of boiling hot distilled water
- about 15 mA of current
- about 20 minutes of process time
Using the circuit above, we will be at 16 mA on average, so it changes the math slightly. We need the mass of silver at the end of the process to be 0.020 grams. In a liter of water, that equals 20 ppm.
M = KIT ==> T = M/(KI)
Time = 0.020 / (0.00118 * 0.016mA) = 1,059 seconds or 17.65 minutes. If you always go to about 20 minutes, you will have more than 20 ppm to be sure. If you are curious, 20 minutes would give exactly 22.6 ppm.
Steps
- Heat 1 liter of distilled water in a clean glass container using the microwave. This typically takes about 4 to 5 minutes. It should be just beginning to boil.
- Connect the above circuit to alligator clips.
- Connect the other end of the alligator clips to the silver electrodes. Ensure the clips do not touch the water. Only silver should be in the water.
- Connect the 9 volt battery to the circuit. At this point the LED should be Off.
- Start adding a few drops of the electrolyte to the distilled water while stirring. Note that the LED should start to light dimly. Slowly add drops of electrolyte and stir until the LED is fully lit. Don't add more electrolyte than needed. Usually about 4 drops are used.
- Start the timer.
- After about 10 minutes, add about 10 drops of corn syrup. The solution should turn more yellow as the ionic silver is converted to colloidal. The heat of the water also starts this process.
- At the 17.5 minute mark, you will have 1 liter of 20 ppm high-quality colloidal silver.
If you do want to nebulize it and breath it in to treat your lungs, read this...
https://www.researchgate.net/publication/340270205_Formulations_for_COVID-19_Early_Stage_Treatment_via_Silver_Nanoparticles_Inhalation_Delivery_at_Home_and_Hospital
https://www.researchgate.net/publication/340270205_Formulations_for_COVID-19_Early_Stage_Treatment_via_Silver_Nanoparticles_Inhalation_Delivery_at_Home_and_Hospital


Hey, good to see you are still active here :) I've been thinking about getting my blog going again, a lot has happened since I blogged last.
ReplyDeleteHi Wretha. Good to see you. Yeah, lots of stuff has happened.
DeleteI got myself thru a ebay a colloidal generator but hadn't got time to test it. I have bought however a couple of bottles of colloidal silver online.
ReplyDeleteOne thing I've always read is that the regular TDS meters aren't really that accurate in measuring PPMs.